Monday, 3 November 2014

Pan-fried chicken wings (with Lee Kum Kee korean marinade) -- 10 pieces

Was away on a holiday to Myanmar and Korea during the last two months. Officially "bankrupt".

Korea is one of the more popular destinations among Singaporeans, it's easy to understand why. Although I'm not a fan of K-culture or K-food but out of curiosity I bought a packet of Korean Marinade from our local supermarket, NTUC to see if it's "up to standard".


Instructions were clear and simple.

Ingredients:
1 packet of Lee Kum Kee korean marinade
10 chicken wings (washed and skin removed)
2 tablespoons of water
4 tablespoons of cooking oil

Method:
1. Marinate the chicken wings by mixing the marinade and chicken wings together. Put them in the fridge for at least an hour.
2. Pan-fry chicken with low heat until golden yellow [mine skipped the colour and went a little charred...]
3. Mix the remaining marinade in bowl with 2 tablespoons of water and pour into the chicken wings. Continue to cook until done.

korean bbq chicken
Masak thoughts: 1 packet is not enough for 10 pieces of chicken wing! Way too bland, maybe I need to marinate overnight instead and add stuff like garlic? I don't know. :/ Decent but definitely not like a pro. BUT! I can't wait to try the box of pancake mix which I had bought from lotte mart (all the way from koreeeaaa) *confidence regained*

Monday, 1 September 2014

snowskin mooncake -- 12 pieces

After watching "Blessings" on Channel 8 (a drama with a story plot revolving around a traditional Chinese pastry shop), I am curious about the making of those traditional chinese goodies. It seems like the Malays are generally quite good at making their kueh-kueh; people love the western desserts and would part with a huge sum of money per month to attend pastry-making courses. But well, what about our huat kueh, ang ku kueh? Will it one day come to "extinction"? Just a thought. Hmph.

Since Mid-Autumn Festival is a week away, a friend's mom (whom I will affectionately refer her as Auntie Nice in this post) was kind enough to invite me and a friend to her kitchen on Sunday to make snowskin mooncakes! What I like about snowskin is...there is no need for oven (no, I have no oven at home).

Get ready your mooncake mould and let the adventure begin!

Ingredients:
300g sieved fried glutinous rice flour [lazy to fry? it's available in stores]
200g sieved icing sugar 
450g ice water
3 tablespoons of canola oil
half teaspoon of pandan essence
Some baked nuts [in this case we have lotus seeds and macadamia nuts]
900g red bean paste [Auntie Nice made the filling.You can either DIY or buy it off the shelf]

Method:

1. Add mixed nuts into the red bean paste. Divide the paste into 12 portions (balls).
2. Mix glutinous rice flour and icing sugar. Add in ice water, oil and pandan essence. Knead well to form a soft dough. Divide dough into 12 portions.

3. Flatten the dough, each dough to wrap a red bean paste ball.
4. Dust each ball with the rice flour and press into the mooncake mould.
5. Gently knock the mould to remove the mooncake.
6. Chill and serve!


we made some small ones of different flavours..kawaii ^.^
[moulds may come in different shapes and sizes, if you are unsure of the volume of your mould, weigh the amount of dough needed to fill up the mould fully. The ratio of skin and filling really depends on your choice. Also, you may add water from boiled pandan leaves for the authentic taste/colour. ]

Snowskin Mooncakes

Masak thoughts: We tried making small mooncakes, they were more challenging to make but manageable nevertheless. The ingredients and preparation are both cheap and easy (of course you can still have the choice to pamper yourself to those branded mooncakes...).
With the array of mooncake choices in the market, let us not forget our roots and the exciting tales behind these colourful (and sometimes even odd-shaped) mooncakes. :)
Can't wait to try out other traditional pastry tutorials! Thank you Auntie Nice and happy Mid Autumn my dear friends!

Monday, 25 August 2014

humble chinese fried rice -- Serves 2 pax

Took half day leave from work this afternoon, realised that I had missed the Chinese New Year off-in-lieu. Still a little bitter about losing the privilege to one day of leave, if only they could extend the validity to 1 year. :X

This evening my mother decided to fry the leftover rice from yesterday. Even though chinese fried rice is such a common dish in Singapore, I cannot seem to google the origin of this dish. Anyway it is another ultra easy comfort food to prepare so the mother just had to give me verbal instructions without having to "SOS" me. It is such a fuss-free dish that you can prepare the dish with any cooked ingredients (preferably dry) you have in the house and just stir fry it. :)

Ingredients (decide the amount and type of ingredients to your liking):
egg (I only used 1)
chopped scallions
diced honey-roasted pork 
leftover rice (already cooked, can be straight from the fridge)
a tablespoon of oil
diced garlic
dark soy sauce (half a teaspoon)
salt

Method:
1. Heat the pan with oil and crack the egg into the pan
2. Add the diced garlic and stir fry together with the egg (it would look like scrambled egg by now)
3. Add the pork and rice. Continue to fry it. Add a pinch of salt.
                                 
4. When it looks all yummy and good, add the dark soy sauce for the colour and flavour! Oh yes, you may add the scallions at the end too, not during the initial step which was what I did. You will end up with burnt scallions if you are as blur as me
5. Fry fry fry briefly~

basic chinese fried rice

Masak-thoughts: Leftover rice, or cooked rice which are left for a few days are dryer which will ensure that the individual grain of rice is "solid" and less clumpy when you fry. There are many variations of fried rice out there, so it can never be boring! It is also a good way to reduce food wastage, whereby your leftover food can be created into a delicious stomach-filling dish. While the home-cooked fried rice may not be as flavourful as those sold in tzechar stalls, it is fun to experiment with your own rendition of fried rice!

Saturday, 16 August 2014

french toast with chicken floss filling

On a hiatus for a month.
My guinea pigs were sick, I was feeling unwell (emotionally, mainly) due to lack of rest from work. Many colleagues (friends) are leaving for various reasons, so occasional waves of low morale would hit me and I start to ask myself some tough questions which I do not have an answer to. =X

Anyhow, I was chatting with a colleague (who was leaving) and I shared with her about the little things I hope to do but find no time to do so, including this blog which is hibernating in a teeny corner of the cyberspace. So I decided to do something for breakfast this morning. I remembered I wanted to make taiwanese egg crepe sometime back but realised I did not have flour in the kitchen. So I settled with something less ambitious -- french toast. :)

Recipe extracted from submerryn:

Ingredients:
an egg
a teaspoon of oil
slices of bread
pork/chicken/fish floss (or anything creative)

Method:
1. Cut 2 pieces of bread into 8 equal parts. [as it's only for myself, I had 1 slice of bread, I conveniently folded it to half]
2. Spoon some chicken floss in the middle.
3. Place a piece of bread to cover the chicken floss and pinch the sides to seal it.
4. Break an egg in a bowl and beat it. Do not add salt as the entire combination is tasty enough. Optional: Add pepper and parsley flakes.
5. Dip the bread into the beaten egg making sure it is well coated.
6. Toast on non-stick pan. Turn over and toast the other side. [i added oil and pan-fried it]
[I used wholemeal bread, which explains the colour of the bread. :X]


french toast with chicken floss filling
masak-thoughts: My mom used to make this when I was young. All-time favourite (there was no such thing as "sinful" when one was a child)! It's ultra easy to make for a noob (just keep it to small fire) and there's no hateful splattering of oil. A happy breakfast is definitely a booster to the entire day!

Monday, 14 July 2014

black sesame pudding (from house kurogoma pudding mix) -- Serves 4 to 5 pax

Black sesame is my ultimate favourite. From black sesame spread to black sesame rice balls I love them all. Just that it's a little heaty for my body to take sometimes but it is said to have nourishing effect on the skin and hair.

It had been a busy week for me due to courses and weekend work assignments so I decided to cheat and bought a box of Black Sesame Pudding (Kuro Goma Purin) mix from Yamakawa Super, A Japanese mart in Tiong Bahru Plaza. 

The instructions look as easy as A-B-C. 


Recipe reflected on the box (the instructions on the box were in Japanese language so do remember to look out for English version provided near the door at the mart):


Ingredients:

The mix~!
400 ml fresh milk

Method:
1. In a pot, open a packet of the Kurogoma pudding powder. Add 400ml fresh milk. Turn on medium flame.
2. Mix well until powder melts. Once boiled, turn to small flame. Continue to boil for 1 minute.
3. Divide the mixture into small container cups. 
[please do it immediately, do not wait any longer as the upper layer of the liquid would have already started to solidify in the pot. I made that mistake and by the time I got down to divide the mixture into small cups, I had to break the upper layer into pieces. I tried reboiling it to reverse the process of solidifying but it didn't work, of course.]

That explains the pieces of dark patches, they are the broken solidified bits.

4. Cool it to room temperate for about 10min. After chilling in the fridge for more than 1 hour...
black sesame pudding
Masakthoughts: The texture is soft, close to a creamy texture. It's very sweet with an extremely milkish taste. They look hideous (nothing like the picture on the box) but the taste was decent for a quick fix like this in the kitchen :)


Sunday, 6 July 2014

mini begedil (fried potato patty)

Recently during lunch, I was introduced to begedil by a colleague. It is a malay potato patty, often added to mee soto or your nasi (rice). The girls would usually scream "a lot of calories ah" but still unable to resist the temptation to order one or two when we were queuing in front of the muslim stall.

As we are approaching Hari Raya Puasa, why not try a malay dish? 

There are lots of slight variations across the different recipes offered online. This looks one of the simplest.

Recipe extracted from Annielicious Food:

Ingredients:
[yes we will be frying so some oil please!]
650g Potatoes, use slightly firmer ones. [I cooked three potatoes, quite small in the size of my fist]
50g Shallots, sliced, fried [you can buy fried shallots off the shelf, hassle-free]
2 sprig Spring Onion
1 sprig Coriander leaves (optional)
1 tsp Salt, or more [I just took a pinch of salt]
dashes of pepper [this was omitted as I forgot about it, oops]
1 beaten egg 


Method:
1. Fry sliced shallots till golden brown. Set aside. Do not discard the shallot oil. Those are good stuffs. 

[I skipped this as I already had some packet ones which you could purchase from stores]

2. Slice potatoes into thick slices, deep fry it until potato slices are cooked. Use chopstick to poke on it to test it's softness. 

[drain your potato slices after washing them (before frying) to minimize splatters. Oil's height could be just enough to cover the slices. According to Annie, there are two versions, you can either fry the the potatoes or boil the potatoes before they are mashed. The fried version originates from Johor whereas the boiled version gives you a healthier alternative I supposed. This is the fried version. :)] 

[the chips look delicious, and they are good to be eaten.]


3. Cut spring onions and coriander leaves. 
[really depends on yourself how much you would like to add, I know some friends who do not eat coriander leaves..]

4. Mash the fried potatoes. You don't have to 100% mash them. Leave some chunks (about 30% roughly mashed). It gives patties a nice bite. 

[I mashed using a metal spoon. It is difficult to mash those golden brown edges...so just leave those chunks..at this point I also added the pinch of salt.]

5. Add fried shallots, spring onions and coriander leaves into the mashed potatoes. Mix well. 

[to your preference! You might want to try adding meat or other ingredients, be creative!]

6. Scoop some of the mashed potatoes and put them into the palm. Repeatedly press and make the patties compact. Roll them into balls and press it into thick patty form. 

[as I did not have sufficient potatoes, I decided to do mini begedils, about 1.5 inches in diameter. Bite-sized begedils..]

7. Heat up enough oil for deep frying - medium heat. 

[the oil's height could be slightly lower than the begedils, just have to overturn them when they become golden brown at the underside.]

8. Beat egg in a bowl.
9. Dip the begedil into beaten eggs, one at a time. And then fry the begedil till golden brown. 

[they smell so nice!]


10. Drain the begedils of excess oil before serving.

begedil

Masak-thoughts: Potatoes potatoes, how can you go wrong with potatoes? Begedil is indeed an unhealthy snack, but by DIY-ing at home, it certainly allows you to have a certain level of control over the ingredients.. So try it! For amateur cook, it takes really long to fry and cut the potatoes but generally manageable with very minimal oil splatters (just remember to drain your potatoes after washing..). The taste is not as good as those sold outside but my tummy is just as contented!

Sunday, 29 June 2014

cranberry white chocolate cookies (40 to 50 pieces)

Cranberry. Another superfruit. Some of my female colleagues are crazy over cranberries due to the fruits' superpower to prevent Urinary Tract Infection.
Cranberry cookie -- definitely an irresistible snack for the health conscious (if you can ignore the amount of sugar that is compressed in a little piece of cookie heh).

So this recipe was found by my friend, S online -- Good Food, Shared. It is a pretty cool blog with step-by-step tutorial recipes, mainly pastries and desserts. Will revisit the blog for more!

Recipe extracted from Good Food, Shared [Please refer to the awesome link for step-by-step description :)]

Ingredients:
150g butter
125g soft light brown sugar
100g caster sugar
2tsp vanilla extract
1 Large egg, straight from the fridge
1 Large egg yolk (also from the fridge)
300g plain flour
1/2 tsp bicarbonated soda
150g dried cranberries
200g white chocolate

Steps:
1. Preheat the oven to 170ÂșC
2. Line either one large or two smaller baking sheets with baking paper and set aside.
3. Melt the butter, set aside to cool slightly- this prevents it from cooking the eggs. Mix the two sugars together then pour the now slightly cool melted butter and mix until the mixture is well combined.
4. Add the vanilla extract and the eggs, mix slowly at first then increase to full speed.
5. Mix on high for 3-5 minutes until the mixture is pale and creamy. Weigh the plain flour, add the bicarbonate of soda and give a quick stir to combine.
6. Add the flour in two batches to the egg batter on the lowest speed and mix enough to just combine.
7. Meanwhile roughly chop the white chocolate into thumbnail sized pieces.
[we bought chocolate chips so there was no need to chop. However, due to Singapore's sweltering weather they quickly melted into unfavourable lumps]

8. Add the dried cranberries and the white chocolate to the cookie dough, barely mix together. Overworking the cookie dough will lead to tough cookies. 
[I guessed we really over-mixed it. Would come to that later.]

9. It is recommended that the cookie dough remains completely cool, so either place in the fridge between batches or place the whole mixing bowl in a basin of ice. Place walnut sized pieces onto the prepared baking sheets.
10. Place the cookies about 4cm apart as they will spread while baking. Bake in the center of the oven for 14 minutes or until they lightly toasted around the edges and a light golden colour.
[and G decided to be creative and mould the dough into heart shapes]

11. Leave to cool on the baking tray for 4-5 minutes, the cookies will harden as they cool.
12. Cool completely on a wire rack.
[S warned us that these were not pressed cookies, therefore the shape would not stay. We only found 1 close-to-perfect heart shape at the end of the baking session.]

cranberry white chocolate cookies

Masak-thoughts: Taste was great. But why was the texture so rough!
I found the cookies really tough too. WAY TO GO!~

Less is more when it comes to dough. 
Overworked dough is a baker’s worst nightmare and it often comes down to temperature. Ideally, you want the kitchen to be cool before you start handling the dough. If yours tends to heat up quickly, work the dough first before turning on the oven. Silverton recommends that you “handle the dough as little as possible and always use your fingertips because they’re cooler than your palms.” When rolling the dough, start from the center and work your way out, flouring the surface and dough as you go. “People are afraid of flour,” Jackson says. However, “if the dough has enough flour in it, don’t be afraid to use enough flour to roll it out. Otherwise, you’ll overwork it.” You can tell when cookie and pie dough is overworked because it will be stretchy and sticky, resulting in poor texture—and results. Deborah Racicot, pastry chef at Gotham Bar & Grill in New York City, says, "If it is a pie crust, the dough will be tough and taste like cardboard. For a sweet dough, the butter may leach out, and be greasy, or even tough.”
[From: http://www.womansday.com/food-recipes/cooking-tips-shortcuts/10-baking-tips-from-the-pros-117036]

Sunday, 22 June 2014

blue berry pie bars

Blue berries are packed with lots of Vitamin C, E and anti-oxidants. They are known to be "brain-food" and can be helpful for those who are combating body fats.
Not to mention these indigo-painted berries look so appetizing and easy to chew -- Once you pop, you can't stop. I am not sure whether these health benefits are retained after being cooked, anyhow it does not stop me from introducing them as the "lead character" today.

My friends (S and G) and I decided to meet for the last time before the preggie goes on maternity leave/ confinement. So what better way can girlfriends spend time together on a weekend afternoon? Yes, we baked.

S, being our shifu (master) whipped out her mobile phone and introduced us the website Foodgawker.
It is a platform to search for food blogger recipes and even if you are not a kitchen person, you can feast your eyes with those pretty pictures of food. :)

After browsing Foodgawker for some time at the supermarket (and being constantly distracted by the random mascots promoting their items), we decided to grab 3 boxes of blueberries and challenge the blueberry pie bars recipe (we made cookies too but I shall leave that for another post).

The strawberries were on sale but S opined we should stick to blueberries as strawberries contain more moisture and we might be setting ourselves up for failure if the pie turned out to be too moist.

Recipe extracted from Kleinworth & Co.

Ingredients:

Crust & Topping
1 1/2 cups all purpose flour
3/4 cup sugar
pinch salt
1 1/2 sticks cold butted (cubed)

Filling
3 cups fresh blueberries
2 eggs
1 cup sugar
1/3 cup all purpose flour
1/2 cup sour cream
pinch salt

Steps:
1. Grease 9x13 glass baking dish- set aside.
2. Preheat oven to 350 degrees.
3. Add flour, sugar, salt & cubed butter to mixing bowl, beat until combined & crumbly.
[But I continued until it became creamy...forgot that the crust should be crumbly!]

4.Take 1 cup of mixture & set aside. Take remaining mixture & firmly press into your baking dish, covering the bottom.
5.Bake 15 minutes.
6. While crust is baking- whisk eggs in a large bowl.
7. Add sugar, sour cream, flour & salt.
8. Gently fold in blueberries. Set aside.
[Look at the happy berries swimming in the mix!]

9. When crust is ready - remove from oven & add filling.
[Remember to bake the bottom crust before adding the swimming blueberries!!]

10. Gently spooning over the top of the crust.
11. Sprinkle with remaining crust mixture you had set aside.
[I over-beaten the mix and it became creamy. Thus the texture of the top crust.] 

12. Bake 1 hour or until top is lightly browned.
[Meanwhile, you could do a lot of things in an hour with your girlfriends..such as napping and going into stone mode. We could smell the sweet crust when the pie was baking in the oven. Berries bursting (literally) in happiness under the heat. Pure excitement!]

13. Cool before serving if eating alone. If serving warm add a scoop of vanilla ice cream on top.
[We didn't have ice cream but it's already oh-so-yummy!]

blue berry pie bars

Masak-thoughts: Shopping for ingredients alone requires certain level of knowledge and some calculation. For example, I didn't know there are so many different types of flour *noob*.
S told me that the ang moh (western-style) pastries are usually very sweet, especially so when the recipes are created by the Caucasians due to taste preferences. So take note and adjust the ingredients to your liking (we reduced the sugar by about 20% or even more..)!
Oh yes, it doesn't matter if you beat the crust mix for too long that it turns creamy instead of crumbly, it still tasted good, or so I think. It was also less messy when we cut and packed the pie into bars (but of course the top layer was not as aesthetically pleasing).
The sour blueberries complement the sweet crust, totally yums! ^.^ I would not have attempted the recipe without the ladies!

Sunday, 15 June 2014

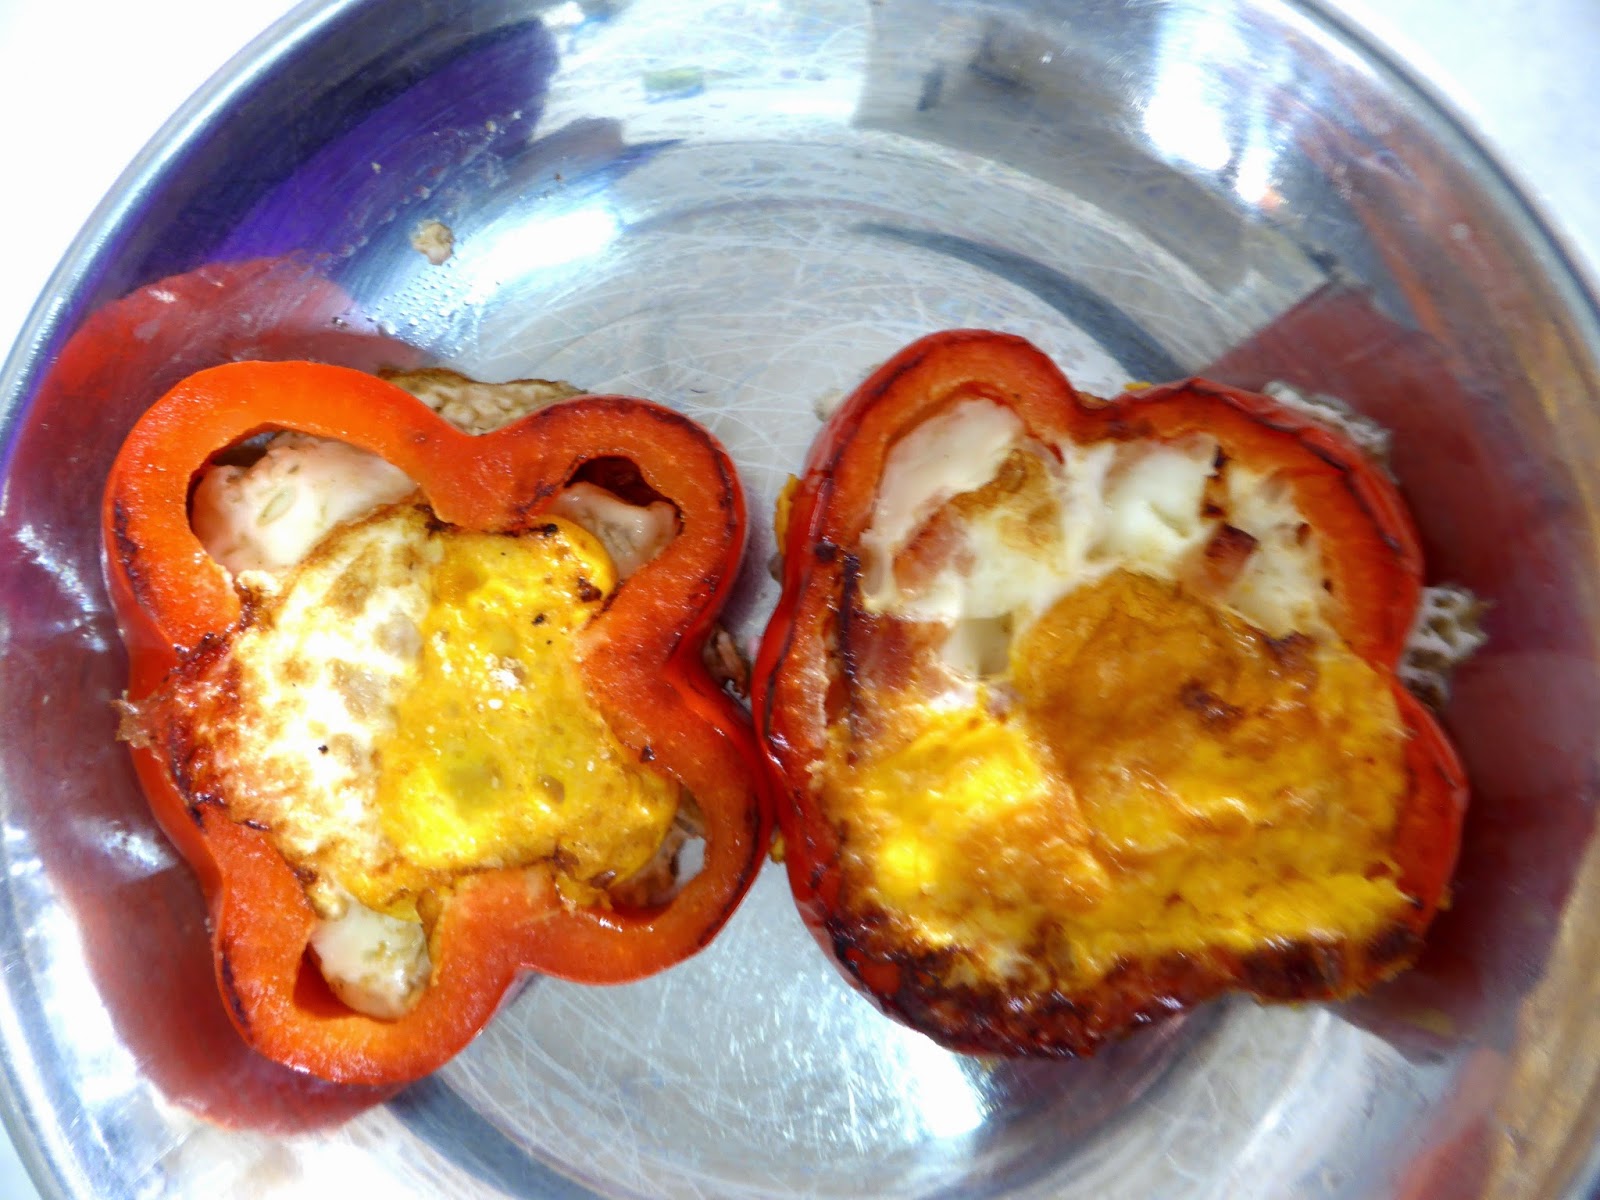
egg in capsicum slice!

And so, I had been wanting to try this which went viral some time ago.

Starting a blog like this motivates me to enter the kitchen. Frying an egg, chicken feed lah (ridiculously easy)! Or so I thought.

Look at the pretty capsicum. @.@

I happily emptied the content in the capsicum and followed the steps. Even added dices of ham in the egg, thinking I had everything under control. 

To my horror, splatters of oil started going wild and I went hysteria over what I saw:

The egg leaked through the bottom of the capsicum slice and there you have, capsicum omelette (slightly charred)?

I cheated and cut away the edge...
egg in capsicum slice

Masak-thoughts: It was really disappointing, I guess this seemingly easy task requires some culinary skills. I did a quick search on Google and found out onion slices work too. Taste was so-so, the savoury ham did make it taste better though. Anyway, had a good laugh with my mom whilst admiring the pathetic eggs.

Oh yes, and Happy Father's Day. My dad was not at home to witness this tragedy...hehe.

Tuesday, 10 June 2014

sesame oil chicken + black fungus (Serves 4 to 5 pax)

My first challenge given by my mum -- Sesame Oil Chicken. Sounds complicated to those who lament "me no cook"? Fret not.

We played cheat by buying steamed chicken from one of the hawker stalls. In that case, you don't even have to worry about your chicken go uncooked. *maniacal laugh*

Ingredients:
Black fungus (to clean by soaking them in water for several hours)
Half steamed chicken (cut; usually already dripping with gravy)
Salt
4 tablespoons of cooking oil
Half a tablespoon of dark soy sauce
A packet of sesame oil which comes with the steamed chicken
2 tablespoons of Chinese rice wine (optional)
A few pieces of sliced ginger

Steps:
1. Add the cooking oil and stir-fry the ginger.
2. Add the fungus + a dash of salt. 
3. Throw in the steamed chicken. Continue to fry. Add dark soy sauce for the colour. 
4. Add the packet of sesame oil for the taste.
5. After some minutes of tossing the chicken, you may feel the ache at your bicep. Add some rice wine if you want the flavour.
6. Cover the lid and allow the content to simmer for 3 minutes.


sesame oil chicken

Masak-thoughts: It was scary to hear the explosive "PSSSSSSSSST" sound when the black fungus landed in the wok. And do note that this hassle-free method does not apply to cooking raw chicken.
The excess water in the ingredients may cause oil to splatter so just beware...stand away from the wok or remove the excess moisture as much as possible before dumping them into the wok! Not a bad first try afterall! :)